
Removing an oil-based stain from wood can be a challenging task, especially if you’re planning to restain or paint the surface. Whether you’re looking to refresh the look of your furniture, floors, or any wooden item, understanding the proper techniques for stain removal is crucial. This can be very important to do before kitchen cabinet painting. This article will guide you through the steps and methods for effectively removing oil-based stains from wood, ensuring a smooth and even surface for your new finish.
Understanding Oil-Based Stains
Oil-based stains are popular for their durability and rich finish, making them a common choice for wood projects. However, they can pose a challenge when it comes to refinishing. Let us understand the characteristics of oil-based stains, the reasons for removing them before applying a new finish, and the common challenges you might face during the process.
Characteristics of Oil-Based Stains
Oil-based stains have several defining characteristics:
- Durability: They penetrate deeply into the wood, providing long-lasting protection and color.
- Rich Color: They enhance the natural grain of the wood, giving it a warm and rich appearance.
- Slow Drying Time: This allows for better workability but also means longer wait times between coats.
- Strong Odor: The fumes from oil-based stains can be strong and require good ventilation during application.
Reasons for Removing the Stain Before Applying a New Finish
Before applying a new finish, it’s often necessary to remove the old oil-based stain. Here are some reasons why:
- Ensuring Adhesion: New finishes may not adhere properly to old stains, leading to peeling or flaking.
- Color Consistency: Removing the old stain ensures that the new finish will have a uniform color and appearance.
- Surface Smoothness: Old stains can cause uneven surfaces, which will affect the smoothness of the new finish.
- Preventing Bleed-Through: Old, dark stains can bleed through lighter-colored new finishes, affecting the final look.
Common Challenges Associated with Removing Oil-Based Stains
Removing oil-based stains can be tricky. Here are some common challenges you might encounter:
- Deep Penetration: Oil-based stains penetrate deeply into the wood, making them difficult to remove completely.
- Residue: Stripping the stain can leave behind residue that requires thorough cleaning before applying a new finish.
- Labor Intensive: The process often involves sanding, scraping, and using chemical strippers, which can be time-consuming and physically demanding.
- Risk of Damage: Aggressive removal methods can damage the wood surface, requiring additional repairs.
Understanding these aspects of oil-based stains and the challenges of removing them will help you prepare for the task and achieve the best results for your wood refinishing project.
Tools and Materials Needed
Successfully removing an oil-based stain from wood requires the right tools and materials. Having everything you need beforehand will make the process smoother and more efficient. This section outlines the essential items you’ll need to gather before starting your project.
Essential Tools
Orbital Sander or Hand Sanding Block: An orbital sander can save time and effort on large, flat surfaces. A hand sanding block is more suitable for smaller or more detailed areas.
- Sandpaper (Various Grits): Use coarse grit (60-80) for initial sanding to remove the bulk of the stain and finer grits (120-220) for smoothing the surface afterwards.
- Putty Knife or Paint Scraper: Useful for scraping off old stain and finish. Ensure it’s sharp and clean to avoid damaging the wood.
- Gel or Liquid Stripper: Choose a high-quality chemical stripper designed for oil-based finishes. Gels are easier to control on vertical surfaces, while liquids work well on flat surfaces.
- Disposable Brushes: For applying the chemical stripper, it’s best to use disposable brushes, as they will be difficult to clean afterwards.
- Fine Grade (0000): For gently scrubbing the surface after applying the stripper to remove any remaining residue.
- Rags or Paper Towels: These are used to wipe down the wood after stripping and cleaning.
- Bucket of Water and Mild Detergent: This is used to clean the wood surface after stripping and before sanding.
Safety Equipment
- Chemical-Resistant Gloves: Essential for protecting your hands from chemical stripper and solvents.
- Safety Goggles: To protect your eyes from splashes and dust.
- Respirator: To protect your lungs from harmful fumes and dust. Make sure it’s rated for organic vapors if you’re using a chemical stripper.
- Fans or Open Windows: Ensure proper ventilation in your workspace to dissipate fumes from the stripper and solvents.
Additional Materials
- Mineral Spirits or Acetone: For cleaning up any remaining stain or stripper residue.
- Protective Coverings: To protect your work area and catch any drips or spills.
- Masking: To protect areas that you don’t want to strip or sand.
Having these tools and materials at hand will prepare you for the task of removing oil-based stains from wood. With the right equipment, you’ll be able to tackle the job efficiently and achieve a smooth, clean surface ready for a new finish.
Preparation
Proper preparation is crucial when removing oil-based stains from wood. This ensures not only the effectiveness of the stain removal but also your safety and the protection of your surroundings. This section covers the importance of a well-ventilated workspace, protecting surrounding areas, and safety tips to follow during the removal process.
Importance of Working in a Well-Ventilated Area
Working in a well-ventilated area is essential when dealing with chemical strippers and solvents, which can release harmful fumes. Proper ventilation helps to:
- Reduce Fume Inhalation: Exposure to fumes from chemical strippers and solvents can be hazardous to your health. Good ventilation minimizes the risk of inhaling these toxic substances.
- Prevent Dizziness and Nausea: Prolonged exposure to fumes can cause dizziness, nausea, and headaches. Adequate airflow reduces these risks.
- Lower Fire Hazard: Many solvents are flammable. Good ventilation helps disperse fumes, reducing the risk of accidental ignition.
To ensure adequate ventilation, work outdoors if possible, or open windows and doors and use fans to circulate air if you’re working indoors.
Protecting Surrounding Areas with Drop Cloths and Painter’s Tape
Protecting your workspace is essential to prevent damage to surrounding areas and to make cleanup easier. Here are some steps to take:
- Use Drop Cloths: Cover the floor and any nearby furniture or surfaces with drop cloths or plastic sheeting. This will catch any drips or spills from the stripper or stain and protect the surfaces beneath.
- Apply Painter’s Tape: Use painter’s tape to mask off areas you don’t want to strip or sand, such as adjacent walls, trim, or hardware. This ensures clean lines and prevents accidental damage.
Tips for Ensuring Safety During the Removal Process
Safety should always be a top priority when working with chemicals and power tools. Follow these tips to protect yourself and others:
- Wear Protective Gear: Always wear chemical-resistant gloves, safety goggles, and a respirator or mask rated for organic vapors to protect your skin, eyes, and lungs from harmful substances.
- Read Product Instructions: Carefully read and follow the instructions on the labels of all products you use, including chemical strippers, solvents, and cleaning agents.
- Keep a Clean Workspace: Regularly clean up any spills and dispose of used rags and brushes properly to prevent fire hazards. Store chemicals in a safe place, away from heat sources and out of reach of children and pets.
- Have a Fire Extinguisher Handy: Keep a fire extinguisher nearby, especially when working with flammable materials. Know how to use it in case of an emergency.
- Take Breaks: Working with chemicals can be exhausting and stressful. Take regular breaks to rest and get fresh air, especially if you’re working indoors.
By following these preparation steps, you’ll create a safer and more efficient workspace, making the process of removing oil-based stains from wood smoother and more effective.
Methods for Removing Oil-Based Stains
Removing oil-based stains from wood can be done using several methods, each with its advantages and challenges. Understanding these techniques will help you choose the best approach for your project.
Sanding
Sanding is a straightforward method for removing oil-based stains, especially effective for flat surfaces and small areas. Here’s how to do it:
- Prepare the Surface: Clean the wood surface to remove any dirt or debris that might interfere with the sanding process.
- Select the Right Sandpaper: Start with coarse grit sandpaper (60-80) to remove the bulk of the stain. Progressively move to finer grits (120-220) to smooth the surface.
- Use Proper Tools: Use an orbital sander for large, flat surfaces and a hand sanding block for detailed areas.
- Sand Evenly: Work in the direction of the wood grain to avoid scratches. Apply even pressure to remove the stain uniformly.
- Clean Up: Wipe down the surface with a damp cloth to remove sanding dust before applying a new finish.
Sanding avoids the use of potentially harmful chemicals. It smooths the wood, preparing it for a new finish. However, the process can be time-consuming and physically demanding. It also generates a lot of dust, which needs good ventilation and cleanup.
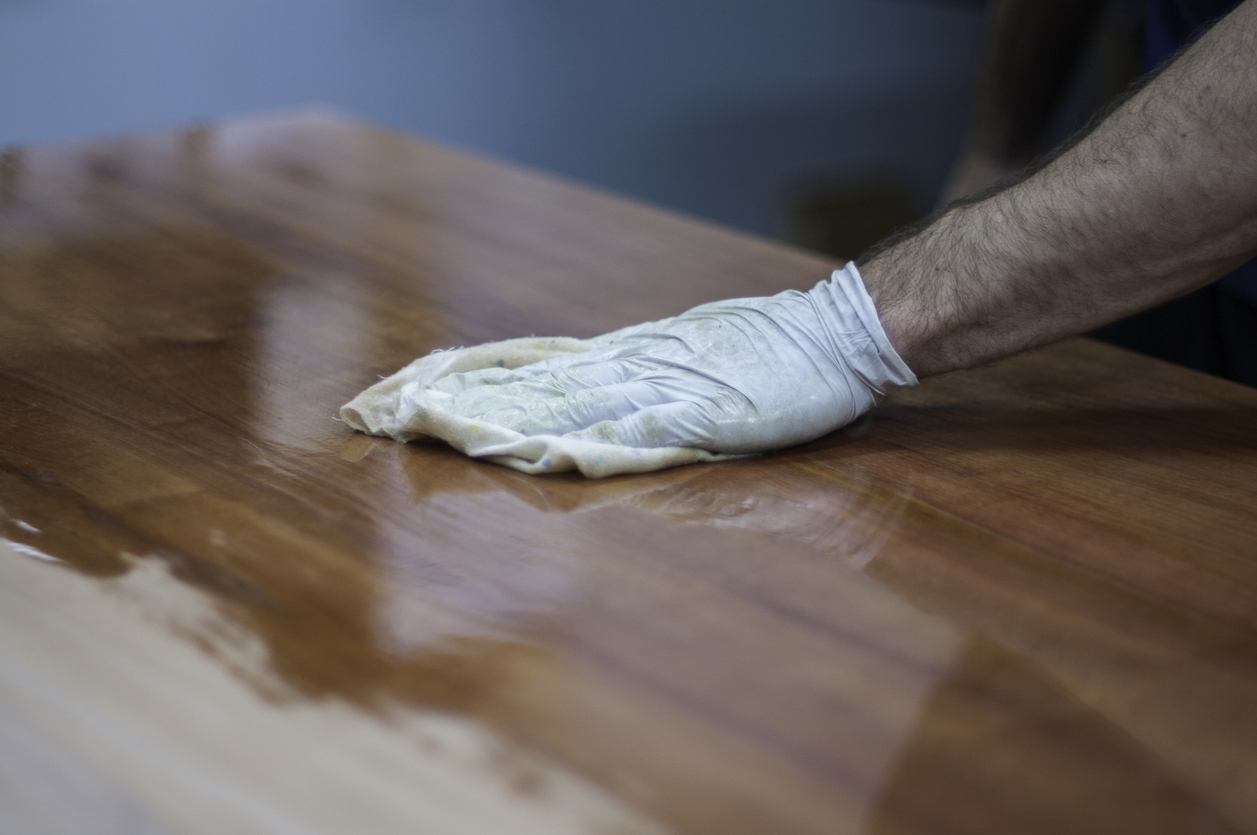
Using Chemical Strippers
Chemical strippers are effective for removing oil-based stains, especially from intricate or large surfaces. They dissolve the stain, making it easier to scrape off. Here are the steps on how to use them:
- Choose the Right Stripper: Select a chemical stripper designed for oil-based finishes. Gel strippers are easier to control on vertical surfaces, while liquid strippers work well on flat surfaces.
- Apply the Stripper: Use a disposable brush to apply a generous layer of stripper to the wood surface.
- Let It Sit: Allow the stripper to sit for the recommended time, usually 15-30 minutes, to break down the stain.
- Scrape Off: Use a putty knife or paint scraper to remove the dissolved stain. Be gentle to avoid damaging the wood.
- Clean Residue: Use steel wool and a solvent like mineral spirits to clean any remaining residue. Wipe down the surface with a damp cloth.
This method can break down old stains quickly, making removal easier. It also requires less physical effort than sanding. However, note that chemical strippers can be hazardous and need protective gear and good ventilation. This process can also leave a residue that needs thorough cleaning.
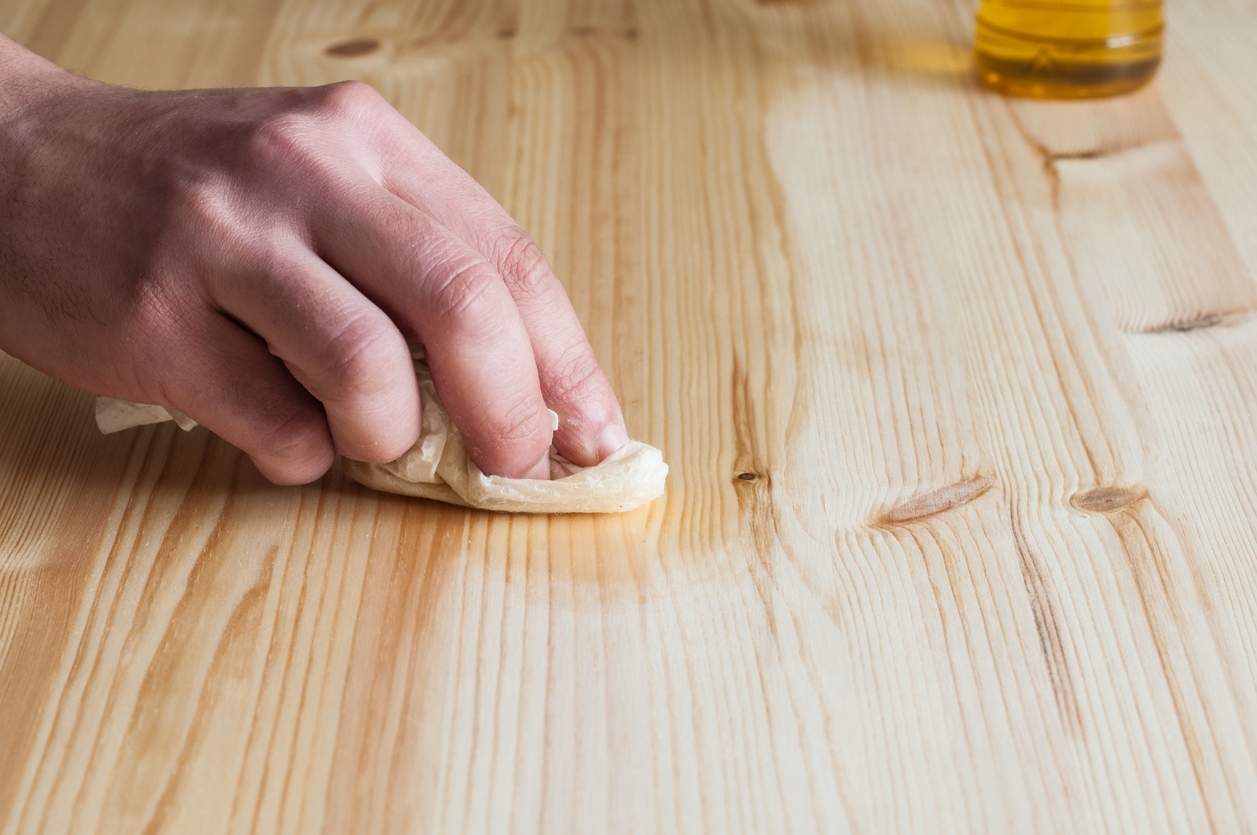
Using Solvents
Solvents like mineral spirits or acetone can help dissolve oil-based stains, making them easier to remove with minimal abrasion. Here are the steps for using solvents:
- Select the Solvent: Choose a solvent suitable for oil-based stains, such as mineral spirits or acetone.
- Apply the Solvent: Dampen a rag with the solvent and rub it onto the stained area.
- Let It Work: Allow the solvent to penetrate the stain for a few minutes.
- Scrub and Wipe: Use steel wool or a clean rag to scrub the surface and remove the dissolved stain.
- Clean Up: Wipe the surface with a clean, damp cloth to remove any remaining solvent and stain residue.
Solvents are less abrasive compared to sanding. It is also easy to apply and needs minimal tools. However, they emit strong fumes and need good ventilation and protective gear. There are times when solvents are not as effective on deeply penetrated stains or large areas.
By understanding these methods for removing oil-based stains—sanding, using chemical strippers, and using solvents—you can select the best approach for your specific project, ensuring a clean and ready surface for a new finish.
Cleaning and Preparing the Wood for Restaining or Painting
Once the oil-based stain is removed, the next step is to clean and prepare the wood for restaining or painting. Proper preparation ensures a smooth, clean surface that allows the new finish to adhere well and look its best. This section covers the essential steps for cleaning and preparing wood after stain removal.
Cleaning the Wood
After removing the stain, it’s crucial to thoroughly clean the wood to remove any residue from strippers, solvents, or sanding dust. Here are the steps to clean the wood:
- Wipe Down the Surface: Use a damp cloth to wipe down the wood surface, removing any loose dust and debris. Ensure the cloth is only slightly damp to avoid soaking the wood.
- Remove Residue: If you use chemical strippers or solvents, there might be some residue left on the wood. Use a clean rag soaked in mineral spirits or acetone to wipe down the surface again, ensuring all residues are removed.
- Scrub with Steel Wool: For any stubborn residue, gently scrub the surface with fine-grade steel wool (0000). This helps to remove any remaining traces of the old stain or stripper.
- Rinse and Dry: After cleaning with solvents or steel wool, rinse the wood surface with a damp cloth and mild detergent. Wipe it dry with a clean, dry cloth and allow it to air dry completely. Ensure the wood is dry before moving on to the next steps.
Inspecting the Surface
After cleaning, inspect the wood for any imperfections or areas that need additional attention. Here are the steps for inspection:
- Check for Smoothness: Run your hand over the wood surface to feel for any rough spots, scratches, or raised grain. These areas need to be smoothed before applying a new finish.
- Look for Stain Remnants: Examine the wood under good lighting to spot any remnants of the old stain that might still be present. If found, these areas might require additional sanding or cleaning.
- Assess for Repairs: Check for any cracks, holes, or other damage that needs repair. Fill these areas with wood filler and sand smooth once dry.
Final Sanding
A final sanding ensures the wood surface is smooth and ready for the new finish. Here are the steps:
- Select Fine Grit Sandpaper: Use fine-grit sandpaper (220 grit) for the final sanding. This ensures a smooth, even surface without removing too much wood.
- Sand the Surface: Sand the wood lightly and evenly, always following the direction of the grain. Avoid applying too much pressure, which can create uneven areas.
- Remove Dust: After sanding, use a vacuum or a tack cloth to remove all sanding dust from the surface. Dust can interfere with the adhesion of the new stain or paint.
Preparing for Staining or Painting
With the wood cleaned, inspected, and sanded, it’s now ready for the new finish. Here are the steps for final preparation:
- Test the Stain or Paint: Before applying the stain or paint to the entire surface, test it on a small, inconspicuous area to ensure you achieve the desired color and finish.
- Gather Materials: Ensure you have all the necessary materials ready, including brushes, rags, stains, paints, and sealers.
- Set Up a Clean Workspace: Make sure your workspace is clean and dust-free to prevent particles from settling on the wet stain or paint.
By thoroughly cleaning and preparing the wood, you create an ideal surface for restaining or painting, ensuring a smooth, even, and long-lasting finish.
Applying the New Finish
Applying a new finish to your wood project is the final step in transforming its appearance. Whether you’re staining or painting, follow these concise steps to achieve a professional-looking result.
- Staining: Mix the stain thoroughly to ensure an even color. Use a brush or clean cloth to apply the stain in the direction of the wood grain. Apply evenly to avoid blotches. After a few minutes, wipe off any excess stain with a clean cloth to prevent a sticky finish. Allow the stain to dry completely, following the manufacturer’s instructions. Usually, this takes 24 hours. For a deeper color, apply additional coats, allowing each coat to dry before applying the next.
- Painting: Apply a primer suitable for wood to ensure better paint adhesion and even coverage. Let it dry completely. Mix the paint thoroughly to achieve a consistent color. Use a high-quality brush or roller to apply the paint in thin, even coats. Work in the direction of the grain for a smooth finish. Let the paint dry completely between coats, as per the manufacturer’s instructions. Apply additional coats as needed for full coverage and a rich finish, allowing each coat to dry completely before the next.
- Sealing (Optional): For extra protection, especially on stained wood, apply a clear sealant or topcoat. This can be a polyurethane, lacquer, or another appropriate finish. Let the sealant dry completely before using the wood item.
By carefully applying the new finish, you ensure a beautiful, durable result that enhances and protects your wood project.
Conclusion
Removing an oil-based stain and applying a new finish can refresh and revitalize your wood projects. By following the proper steps for stain removal, cleaning, preparation, and application, you can achieve professional-looking results.
For expert assistance in the San Ramon, Dublin, Pleasanton, Livermore, and Danville areas, contact Custom Painting, Inc. at 925-866-9610 or reach out through our contact form. We’re here to help with all your painting and staining needs.