

Have you ever tried to paint a wall in your home and noticed annoying bubbles popping out sometime after? It can be frustrating, especially after spending time and money to make your home look right. But don’t worry; you’re not alone. Bubbling paint is a common issue many homeowners face. The good news is, with a bit of guidance, you can prevent it from happening and even fix it if it does.
What is Paint Bubbling?
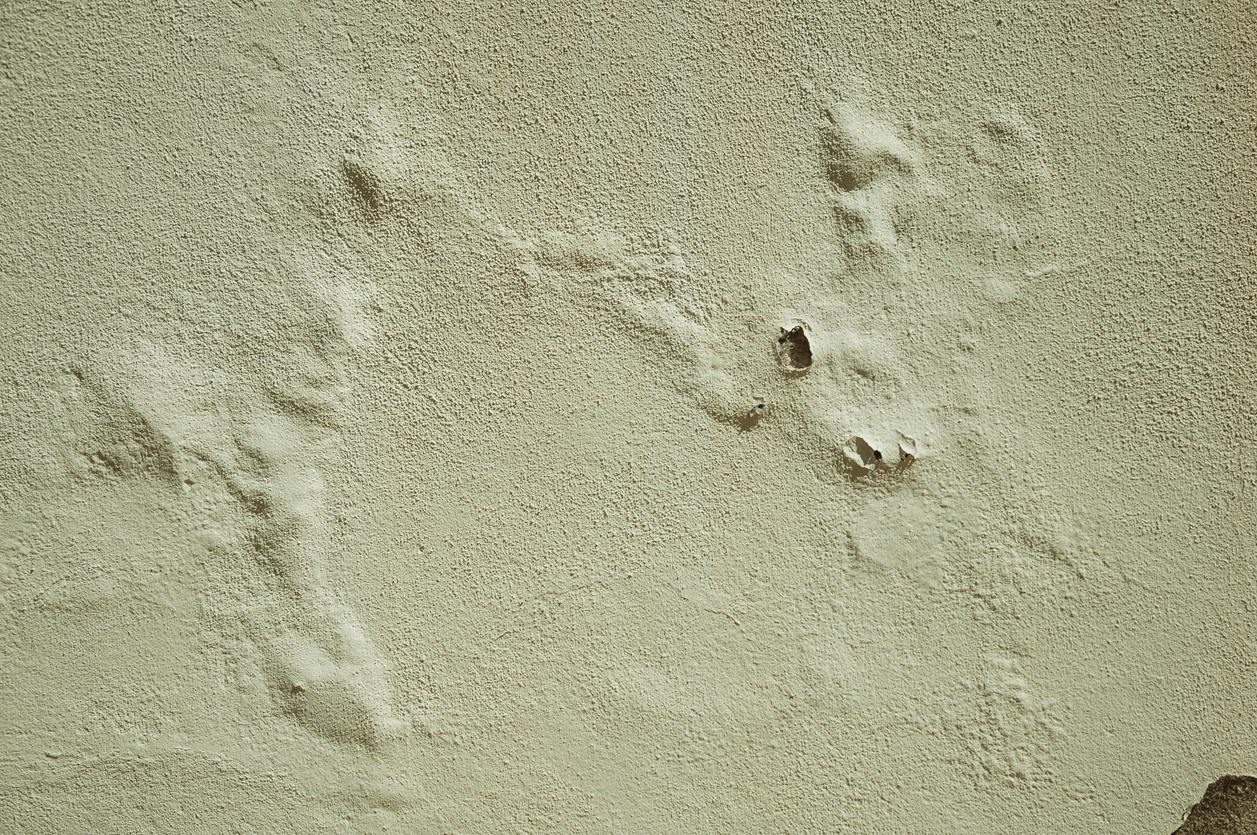
Have you ever noticed unsightly bubbles or blisters on your painted walls? That’s what we call paint bubbling. These bubbles can form shortly after you’ve finished painting or even months later. Paint bubbling occurs when the paint film lifts from the underlying surface, creating a blister-like appearance.
You might see small, raised areas on your painted walls that feel spongy or soft to the touch. These bubbles can vary in size and may pop when pressed, revealing bare or uneven patches beneath. Over time, if left untreated, bubbling paint can worsen, leading to more significant peeling and damage.
It’s not just an aesthetic issue—these bubbles can also compromise the integrity of your paint job, making it more prone to peeling and flaking. It weakens the adhesion between the paint and the surface, which can lead to larger areas of peeling paint. This makes your walls look worse and means you’ll need to repaint sooner than expected, adding to your maintenance costs and efforts.
Common Causes of Paint Bubbling
What makes paint bubble? Here are the common causes:
Moisture issues
One of the primary culprits behind paint bubbling is moisture. Whether it’s from humidity, leaks, or damp surfaces, water can seep into the paint and cause it to lose adhesion. This is especially common in areas like bathrooms, kitchens, or basements, where moisture levels are typically higher. Ensuring proper ventilation and addressing leaks or dampness can help prevent this issue.
Poor surface preparation
Another common cause of bubbling paint is inadequate surface preparation. If the surface isn’t properly cleaned, sanded, or primed before painting, the paint may not adhere well, leading to bubbles. Dust, grease, old paint, or any other contaminants left on the surface can interfere with the bonding process, causing the paint to lift.
Applying paint in unsuitable conditions
Painting in the wrong conditions can also lead to bubbling. Extreme temperatures, high humidity, or painting in direct sunlight can cause the paint to dry too quickly or unevenly, leading to bubbles. It’s essential to follow the paint manufacturer’s recommendations regarding the best conditions for application to ensure a smooth and durable finish.
Incompatible paint layers
Using incompatible paint types or mixing different brands and formulations can result in bubbling. For example, applying oil-based paint over latex paint without proper priming can cause the layers to separate and form bubbles. Always ensure that the paint layers you’re using are compatible and that you follow the recommended procedures for transitioning between different types of paint.
How to Fix Bubbling Paint
If you have seen some paint bubbles on your walls, the good news is you can still fix it. Here’s how to do it:
Identify the cause.
The first step in fixing bubbling paint is to identify what’s causing the problem. Take a close look at the affected area to assess the extent of the damage. Is it a small patch, or are bubbles all over the wall? Next, try to determine the source. Is there any sign of moisture, such as leaks or damp spots? Could poor surface preparation be to blame, or did you paint under unsuitable conditions? Understanding the root cause will help you address the problem effectively and prevent it from happening again.
Remove the bubbled paint.
Once you’ve identified the cause, it’s time to remove the bubbled paint. Start by scraping off the affected area using a paint scraper or putty knife. Be gentle to avoid damaging the underlying surface. After scraping, sand the surface smooth with fine-grit sandpaper. This step ensures that the new paint will adhere properly and creates a smooth, even base.
Prepare the surface for repainting.
With the bubbled paint removed and the surface sanded, the next step is to prepare the area for repainting. Clean the exposed area thoroughly to remove any dust, dirt, or grease. You can use a mild detergent and water for this. Once the surface is clean, make sure it’s completely dry before proceeding. If the problem was caused by moisture, take extra care to ensure the area is dry. Apply a primer to the exposed area to create a uniform surface and improve paint adhesion.
Repaint the area.
Now that the surface is prepped, you’re ready to repaint. If necessary, start with a primer to ensure the new paint bonds well with the surface. Then, apply thin, even coats of paint using a high-quality brush or roller. Avoid applying thick layers, as they can take longer to dry and are more prone to bubbling. Allow each coat to dry thoroughly before applying the next one. Follow the manufacturer’s recommendations for drying times to achieve the best results.
How to Prevent Paint Bubbling

To prevent paint bubbling on your next painting project, here’s what you need to do:
Prepare the surface properly.
When it comes to preventing paint bubbling, proper surface preparation is key. Before you even open a can of paint, make sure your walls are clean and dry. Dust, grease, and other residues can prevent the paint from sticking properly, leading to bubbles. Use a mild detergent and water to clean the surface, then let it dry completely.
Sanding and priming are also crucial steps. Sanding smooths out any rough spots and helps the paint adhere better. Priming creates a uniform surface and seals any imperfections, providing a solid base for your paint. Don’t skip these steps if you want a long-lasting, bubble-free paint job.
Control moisture.
Moisture is a major enemy of paint. To prevent bubbling, it’s important to control moisture levels in your home. Fix any leaks or damp areas, especially in rooms like bathrooms and kitchens. Good ventilation is also essential. Use exhaust fans and open windows to keep air circulating and reduce humidity.
Dehumidifiers can be a great help in keeping moisture at bay, especially in humid climates or during rainy seasons. You can significantly reduce the risk of paint bubbling by addressing moisture sources and ensuring good airflow.
Choose the right paint and tools.
Using high-quality, compatible paints can make a big difference in preventing bubbling. Invest in reputable brands and ensure that the paint types you’re using are compatible with each other. For example, use a proper primer to avoid compatibility issues if you’re switching from oil-based to latex paint.
The tools you use also matter. High-quality brushes and rollers provide a smoother finish and better coverage. They help apply the paint evenly, which is crucial for avoiding bubbles.
Apply paint correctly.
Following the manufacturer’s instructions is essential for a successful paint job. Each paint has specific guidelines for application, including recommended thickness, drying times, and conditions. Applying thin, even coats is particularly important. Thick layers take longer to dry and are more prone to bubbling.
Allowing adequate drying time between coats is also critical. Rushing the process by applying a new coat before the previous one is fully dry can trap moisture, leading to bubbles. Patience is key to achieving a smooth, professional finish.
Observe ideal painting conditions.
The weather and environmental conditions during painting play a significant role in preventing bubbling. Aim to paint in moderate temperatures and avoid extreme heat, cold, or humidity. Too much heat can cause the paint to dry too quickly, while cold and humidity can prevent it from drying properly.
Check the paint can for the optimal temperature and humidity levels recommended by the manufacturer. Painting in suitable conditions ensures the paint cures properly and adheres well to the surface, minimizing the risk of bubbles.
Final Word
Achieving a flawless paint finish might seem daunting, but with the right practices, it’s absolutely doable. Remember, the key to a beautiful, long-lasting paint job lies in careful preparation, choosing quality materials, and paying attention to details during the painting process. By following the tips and steps we’ve outlined, you can prevent common issues like bubbling and ensure your walls look stunning for years to come.
If you ever encounter a tricky painting problem or simply want the peace of mind that comes with a professional touch, don’t hesitate to contact us at Custom Painting, Inc. Our team of experienced painters is ready to help you with any painting project, big or small. Whether you need advice, repair work, or a complete repaint, we’re here to ensure your home looks its absolute best.
Give us a call at 925-866-9610 or inquire through our contact form to learn more about our services and how we can help you achieve the perfect paint job.