
Patching walls and getting a smooth, seamless paint finish might seem straightforward, but it often requires more finesse than expected. Whether you’re dealing with minor dents or larger surface flaws, the right approach and materials can make all the difference to performing drywall repair and texturing.
While some in the Dublin, CA area might tackle these tasks themselves, there’s no shame in calling in the pros—especially if you want a flawless result. Let’s walk you through the essentials and help you decide when it might be time to bring in expert help.
Preparing for Wall Patching
Before you dive into wall patching, it’s important to get familiar with the basic things you need to know, such as:
1. Choosing the Right Tools and Materials
Having the right tools makes all the difference when it comes to wall patching. A putty knife, for instance, isn’t just a simple blade—it’s your key to applying drywall compound smoothly and evenly. A flexible blade is great for getting that perfect feathered edge, while a stiffer knife can help tackle tougher spots.
Speaking of drywall compounds, you’ll find different types. Lightweight compounds are easy to sand and perfect for small patches. Setting-type compounds dries faster and are more durable for larger repairs, though they’re a bit harder to sand. Pair this with fine-grit sandpaper, usually between 120 and 220 grit, to gently smooth the surface without damaging the wall.
Remember your primer and paint. A high-quality primer is essential because it helps the paint adhere better, and it’s particularly important if you’re patching over stains or darker colors. As for paint, going for a premium option might cost a little more upfront, but the thicker coat and better pigmentation mean you’ll need fewer layers, which ultimately gives you a more polished look.
2. Preparing the Surface
Before you even think about slapping on that drywall compound, take a moment to prep your surface. This step is crucial and often overlooked. Start by cleaning the wall to remove any dust, dirt, or grease that could prevent the compound or paint from sticking properly. A simple wipe-down with a damp cloth should do the trick.
Next, you’ll want to identify all the areas that need patching. Look for any dents, cracks, or holes that stand out. Mark these spots lightly with a pencil so you can easily find them when you start working. If the wall has any peeling paint or loose material, be sure to scrape that off as well. Otherwise, your patching work won’t adhere properly, and you could have an uneven finish.
Step-by-Step Guide to Wall Patching and Painting
Now that your tools and materials are ready, it’s time to dive into the process. Wall patching and painting might initially seem intimidating, but by breaking it down into simple steps, you’ll see that it’s more manageable than you think.
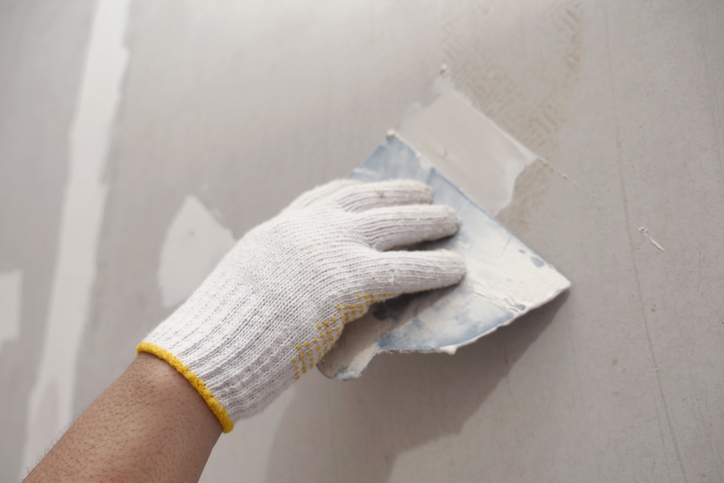
1. Apply Drywall Compound
The first step in wall patching is applying drywall compound. Start by scooping a small amount onto your putty knife. You want to apply it in thin layers, gradually building up the thickness as needed. The key here is to extend the compound beyond the area you’re patching—about four to six inches beyond the patch—to ensure it blends seamlessly with the surrounding wall. This way, you won’t end up with a noticeable bump or depression.
As you apply the compound, smooth it out as much as possible. Don’t worry if it’s not perfect; you’ll have a chance to refine it during the sanding process. Let the compound dry completely before moving on to the next step. Drying time can vary depending on the type of compound you’re using, so be patient and give it plenty of time to set.
2. Sand for a Smooth Finish
Once the drywall compound is dry, it’s time to sand it down. This step is all about achieving a smooth, even surface that blends seamlessly with the rest of the wall. Use coarse-grit sandpaper around 120 to 220 grit to gently sand the patched area. The goal is to remove any rough spots or bumps while tapering the edges of the patch so they blend into the surrounding wall.
As you sand, make sure to check your work frequently by running your hand over the surface. You should be able to feel when it’s smooth and level. Be careful not to over-sand, as this can create indentations in the wall. Also, remember to wear a face mask and safety goggles to protect yourself from dust.
3. Prime the Surface
After sanding, the next step is priming the patched area. Primer is crucial because it helps the paint adhere better and prevents the patch from absorbing too much paint, which can lead to an uneven finish. Apply a thin, even coat of primer over the patched area, covering the entire patch and extending slightly beyond it.
Using a regular paintbrush, carefully brush on the primer, ensuring you don’t miss any spots. If you do stray outside the patch area a bit, don’t worry—the paint will cover that up later. Allow the primer to dry completely before moving on to painting.
4. Paint the Patched Area
Finally, it’s time to paint. The most important thing to remember here is to use the same paint as the rest of the wall. If the paint is aged and doesn’t match exactly, it might be worth repainting the entire wall to ensure a consistent look.
Start by applying a thin coat of paint over the primed area. Once it’s dry, step back and take a look. If you can still see the outline of the patch, don’t panic—this is normal. Apply a second coat to improve coverage. In some cases, a third coat may be necessary to thoroughly blend the patched area with the surrounding wall.
And there you have it! With these steps, your wall should look as good as new, with no sign of the patchwork you’ve done. If this process feels overwhelming or you’re dealing with extensive wall damage, it might be time to consider hiring a professional to get the job done right.
Why Hire a Professional?
While wall patching and painting might seem like a doable DIY project, there are times when hiring a professional is the best choice. Professionals bring expertise, experience, and the right tools to ensure your walls look perfect, which can be especially important for larger or more complex jobs.
When you’re dealing with more than just a few minor patches, the project’s complexity can increase significantly. Large areas may require more advanced techniques to ensure the patched areas blend seamlessly with the rest of the wall. This is where professional contractors can help. They have the experience to handle these challenges efficiently, saving you time and stress. They also understand the nuances of different materials and can select the best products for your specific needs, which can be overwhelming for a DIYer.
1. Benefits of Professional Expertise
Hiring a professional isn’t just about saving time—it’s also about getting a result that lasts. Professionals know how to properly prep surfaces, apply materials, and finish the job to ensure that your walls look smooth and flawless. They are also equipped to handle unexpected issues, like finding underlying damage that might need to be addressed before patching can begin.
Another significant benefit is the peace of mind from knowing the job is done right. Professionals have the training and experience to avoid common mistakes that could lead to future problems, such as paint peeling or patches becoming visible over time. Plus, they often have access to better quality tools and materials than what’s readily available to the average consumer.
2. The Importance of Hiring Licensed and Insured Contractors
When hiring a contractor, it’s crucial to ensure they are licensed and insured. This protects you in case something goes wrong and indicates that the contractor is a legitimate business with the proper qualifications. Licensed contractors are required to meet certain standards, which can give you confidence in the quality of their work. Insurance is equally important, as it protects you from liability in case of accidents or damage during the project.
3. Why Choose Custom Painting, Inc.?
If you’re considering hiring a professional, look no further than Custom Painting, Inc. With over 40 years of experience in the painting industry, we’ve built a reputation for delivering top-notch results in both residential and commercial projects. Custom Painting, Inc. is licensed and insured, offering you peace of mind along with high-quality workmanship.
Our expertise goes beyond just painting—we also offer services like popcorn ceiling removal, custom molding installation, and general repair and replacement work. This means you can rely on us to handle many home improvement projects, ensuring consistency and quality throughout your home.
Summary
In the end, while DIY projects can be rewarding, there are times when bringing in a professional is the smartest choice. When it comes to wall patching and painting, the expertise, experience, and peace of mind that a professional contractor offers can make all the difference. If you want your walls to look their best, consider reaching out to Custom Painting, Inc.—a trusted name in the industry with a proven track record of excellence. Call us at 925-866-9610 or fill out our contact form to schedule an appointment and get a free estimate.